
The Correct Way To Wash An Aircraft
Before we start with how to wash an aircraft correctly and successfully, maybe we should first ask, why should we wash it? Is this a trick question? Not really.
Of course we wash aircraft to make them clean again after service. Why do they need to be clean?
Is it purely for aesthetic reasons or is there a more important agenda behind this time-consuming task?
The primary purpose of washing is to reduce the amount of corrosion occurring in the airframe. Washing is the first step in the aircraft’s CPCP (Corrosion Prevention & Control Plan).
It has been estimated that 80% of maintenance costs during an aircraft’s life span are attributable to corrosion, so anything that can be done to reduce this figure is of significant benefit.
Other reasons for washing are safety-related: being able to see through windows clearly, not slipping when boarding or disembarking on oil and exhaust fouling etc. Surprisingly to most people, aerodynamics and fuel burn are on the bottom of the list of reasons for washing.
Another highly important, but often overlooked safety benefit of washing is that it provides an opportunity for a thorough inspection. While washing, one can carefully inspect the airframe for impact damage, degradation to seals and plastic components, loose fittings and fastenings and other potential problems.
Now that we have ascertained why we are going to wash the aircraft, let’s get ready to do it.
Equipment Check List
- Cleaning fluid
- Buckets
- Mop/brush/sponge
- Chamois
- A hose with fine spray nozzle
- Other items of personal preference.
If you are really fortunate, you may have access to a foam applicator for applying the cleaning fluid. This is always the preferred method of applying any cleaning fluid to an aircraft. It saves time and reduces product usage and it is our experience that foam application of correct cleaning products provides the greatest defence against corrosion.
Pressure Cleaners Not Recommended
Notice that a pressure-washing device IS NOT INCLUDED in this list! Pressure washers have no place in aircraft cleaning! High pressure water will drive dirt and contaminants deep into lap joints and cavities, causing long-term degradation and damage to the airframe, along with the sand-blasting effect that is created with the particles of grime. Water applied under pressure can also damage and penetrate seals, exacerbate paint loss, and damage the adhesive bonds found on aircraft structures.
Be Careful What You Wash With
Another literally potentially fatal mistake that even professional operators make, is to use cleaning products not specified or intended for aircraft use.
On any aircraft type, whether it be ultralight, gyro, GA, RPT or heavy commercial, ONLY use products that have been formulated and approved for use on airframes.
Truck and car cleaners undoubtedly do a very good job of cleaning, but they often contain highly corrosive ingredients that may damage the aircraft. The average person does not realise that truck wash usually contains predominantly caustic soda, not something which is compatible with aluminium and other aircraft substrates. Just as alarmingly, many household cleaners and detergents contain high levels of salt. Yes, sodium chloride. Probably the very stuff we are wanting to clean off our aircraft exterior. There are a number of cleaners on today’s market that are being promoted as suitable for aircraft use but have undergone no suitability testing. As a minimum, any aircraft cleaner should have been tested for conformance to AMS 1526B and Boeing BSS7432 by an independent testing laboratory.
 Interestingly, when it comes to corrosion protection, we are not yet out of the swamp. Not all aviation approved cleaning products are created equal. Although a product may conform to Boeing and AMS specifications, it is important to understand that this does not mean that the product will effectively inhibit corrosion. In fact, it also doesn’t guarantee that a cleaning product won’t contribute to corrosion.
Scientific studies have shown that a popular, fully approved aviation cleaning product increases corrosion rates dramatically.
How is this possible?
To meet specifications, a cleaning product is only required to demonstrate that it will not corrode an airframe at a greater than specified rate. The accepted corrosion rate threshold varies between Boeing, AMS and MIL-SPEC. This is why it is important to do your research when choosing an aircraft cleaning product. Using a product that is scientifically proven to inhibit and arrest corrosion can save you tens of thousands of dollars in avoidable maintenance costs.
Even if you have a composite aircraft your choice of cleaning product is of equal importance as to that of a metal airframe. Many constituents of commercial and household cleaners will irreversibly damage composite substrates, acrylics, rubber and synthetic seal materials, and even two-pack paint. The wrong choice of cleaner may even damage electrical wiring and terminations. When cleaning products are evaluated for military usage, they are specifically tested on wiring and electrical components.
Above all, never use cleaners containing solvents. These may, as well as damaging the substrate, remove grease from inside bushes and penetrate or otherwise damage seals on rod ends and similar components.
How To Wash The Aircraft
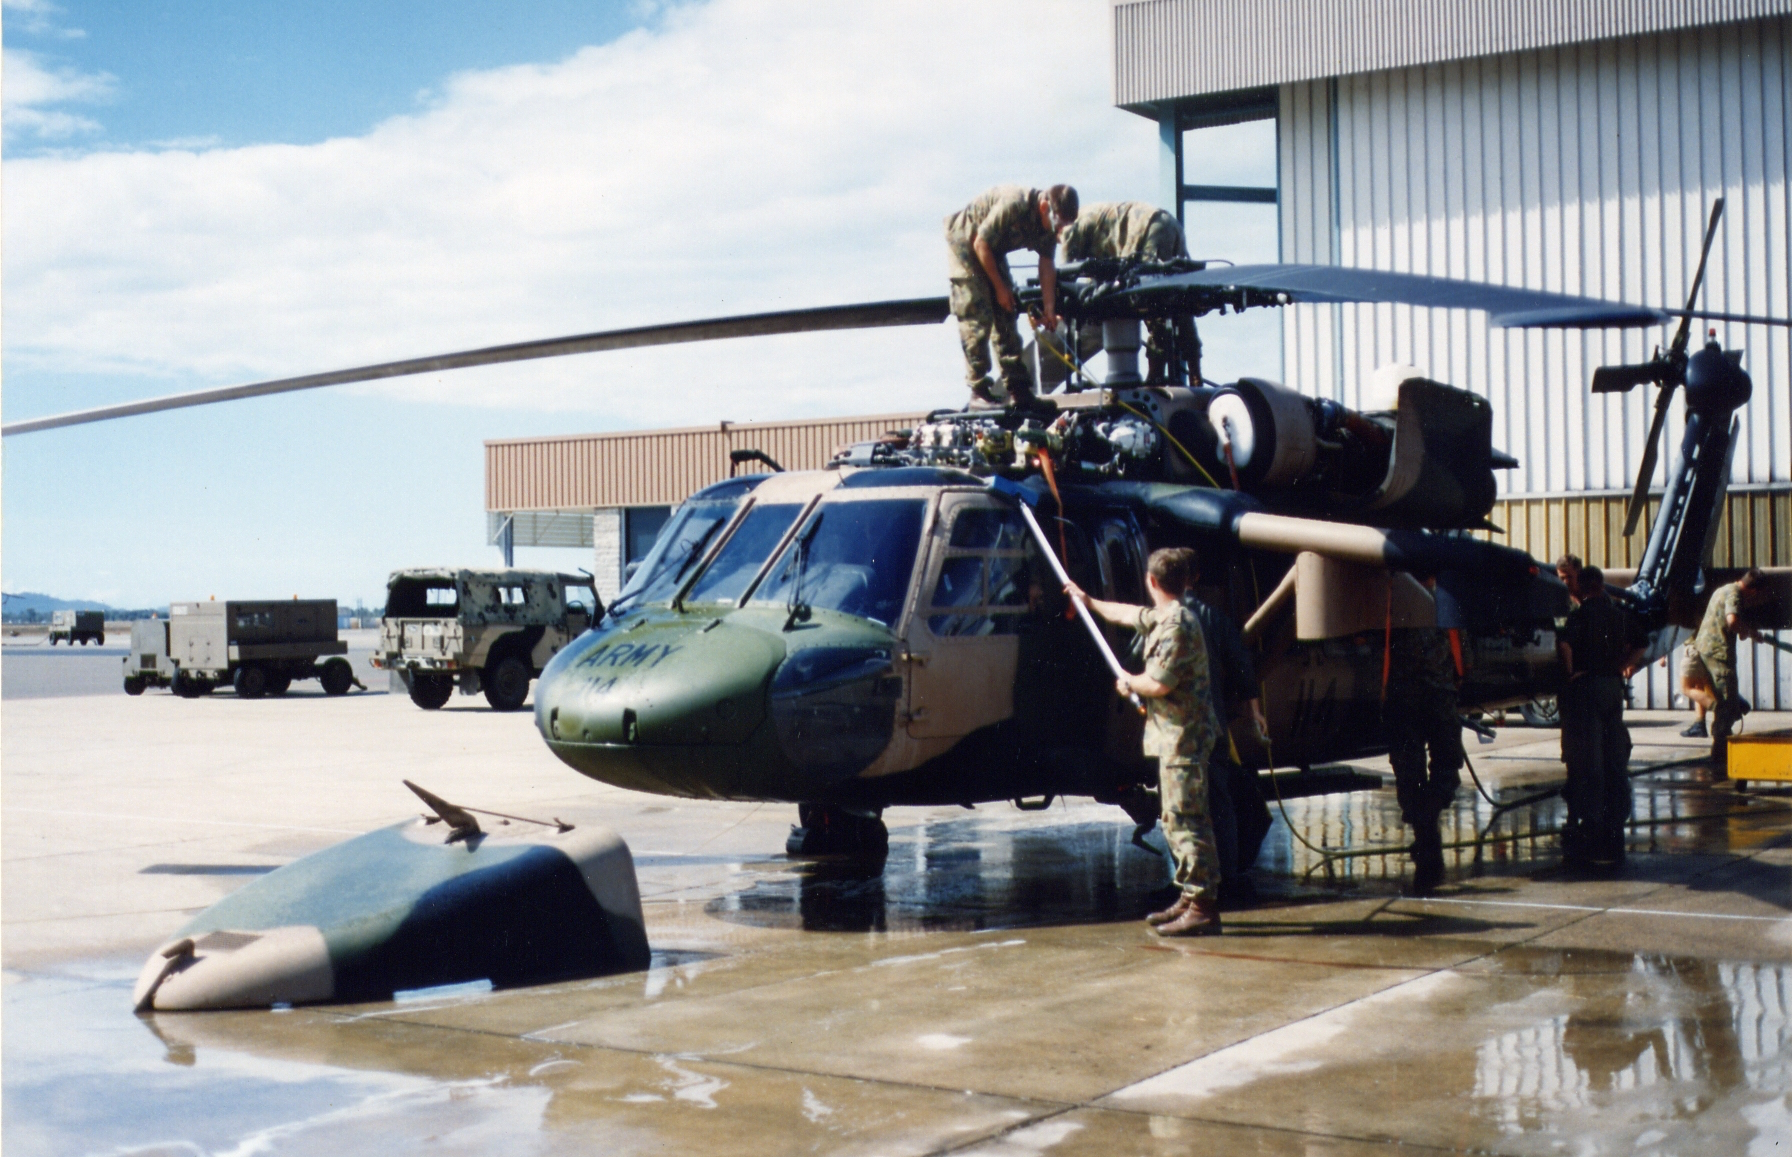
Now let us begin:
- If your aircraft’s manual requires it, tape up doors with the correct “low stick” masking tape.
- Cover pitot tubes, AOA sensors etc. with either the same “low stick” masking tape, the fabric covers supplied with the aircraft, or as the aircraft’s manual instructs.
- Follow any other procedure outlined in your aircraft’s maintenance manual.
- Lightly rinse the entire aircraft to remove loose material and dust/dirt that might scratch the surface.
- Dilute a small quantity of cleaning fluid to the manufacturer’s recommended strength for ‘heavy duty’ or ‘badly soiled’ (i.e. strong). With this concentrated solution, wash all badly fouled areas of the aircraft including brakes and wheels, oleos, exhaust trails, oil streaks and deposits around static wicks.
Applying The Aircraft Cleaning Product
Most people use a sponge to apply the liquid. Purpose-made soft bristle brushes designed for washing cars are readily available and lend themselves to aircraft washing. A recommended alternative is to spray this strong solution on to these areas with a pressurised sprayer. These are easily found in hardware stores in the gardening section.
Special Note: Read Before Proceeding
Implements (sponges, brushes, etc) used on these badly fouled areas should not be used on the rest of the airframe. Use another set for general airframe cleaning. There is abrasive and potentially damaging material on these areas that you do not want transferred to the rest of the airframe.
- Next, make up a dilution of the cleaning product at the ratio specified for general (or light) cleaning. With this, go over the entire airframe, starting at the highest point and agitating the solution on the surface with a sponge, broom or rag to loosen dirt and grime. Special brooms are available that are designed for washing trucks and coaches. They are made from materials that will not scratch or damage the surface they are being used on. On an aircraft they save a lot of bending and stretching, not to mention keeping you away from the stuff dripping off the underside of the aircraft.All cleaning products require a bit of physical effort, despite their manufacturers’ claims of miracles! Products that do not require movement or agitation on the surface are much too aggressive for aircraft use and may contain toxic substances that could end up in your liver. Let alone the damage they must be doing to your aircraft.
- From this point on, depending on the type of airframe, the cleaning process may need to be broken into sections, with rinsing done at the end of each section. Again, no matter what the manufacturers claim, most detergents will leave spotting that is difficult to remove if they are allowed to dry on the surface. In light of this, move across the airframe as quickly and systematically as possible, using this opportunity to inspect the surface for any damage or defects. To complete the cleaning process re-wash the areas that were pre-cleaned with the concentrated solution. If any parts have been missed go back and re-apply solution to them and rewash.
- Lightly rinse the entire airframe using a fine spray from the hose, and if required finish off with a chamois.
‘To wax or not to wax?’
Some people swear by the application of a wax or polish to their paintwork. Generally, waxing or using wax containing detergents is discouraged on aircraft. However, if you choose to apply a surface finish, be exceedingly careful to ascertain that it is suitable for and certified for aircraft use. Many polishes contain a cocktail of solvents and hydrocarbons that must never be applied to aircraft. Unfortunately in Australia, there is documented evidence that the use of automotive waxes and cleaning products caused severe damage that necessitated the grounding of aircraft. Some preparations also build up a film on the surface which can capture and lock in marks and blemishes, making future cleaning more difficult. Even if the product information states that it is safe for use on plastics DO NOT apply it to windscreens, canopies and bubbles, or any other plastic aircraft substrate. Again, we are faced with problems that are not a great concern in other facets of life outside of aviation. Many products can leave a film on the windscreen which will produce optical distortion or a halo effect. Both these can be very dangerous in an aircraft. Haloing causes a circular rainbow image to appear on the solid surface of the windscreen. It can be very annoying and dangerous, as it can obscure vision.
Aircraft Windscreen Cleaning Tips
When working on a clear surface, such as the windscreen, there is a method that should not be deviated from. When rubbing with a cloth, sponge or even fingers, ALWAYS rub vertical to the horizon.
This is extremely important. Should you unwittingly scratch the surface, you will be able to look around the scratch rather than having to try and look through it. Multiple fine scratches can produce a form of optical distortion which fortunately only has minimal effect when viewed vertically. Again, most importantly, only use transparency cleaners that are specifically designed for aviation use. Household or automotive products are not suitable for use on aircraft plastics. Additionally, generally speaking, any product in a pressurised spray can is not suitable for use on aircraft transparencies as they contain hydrocarbons and will slowly degrade the plastic. Remember that pressure pack cans must not be carried on board either.
In closing, many aircraft manuals are sadly deficient in instructions on how to clean an aircraft without causing damage to it. Likewise, aircraft engineers and aircraft cleaning contractors are often undertrained in this area of aircraft maintenance.
Learning the best practices of how to wash an aircraft is well worth the effort. With the right technique and choice of cleaning products and tools, you can maintain your aircraft in optimal condition and save enormous amounts of money on avoidable maintenance – so you can enjoy more time in the air and less time in the hangar.
Conclusion
In closing, many aircraft manuals are sadly deficient in instructions on how to clean an aircraft without causing damage to it. Likewise, aircraft engineers and aircraft cleaning contractors are often undertrained in this area of aircraft maintenance.
Learning the best practices of how to wash an aircraft is well worth the effort. With the right technique and choice of cleaning products and tools, you can maintain your aircraft in optimal condition and save enormous amounts of money on avoidable maintenance – so you can enjoy more time in the air and less time in the hangar.
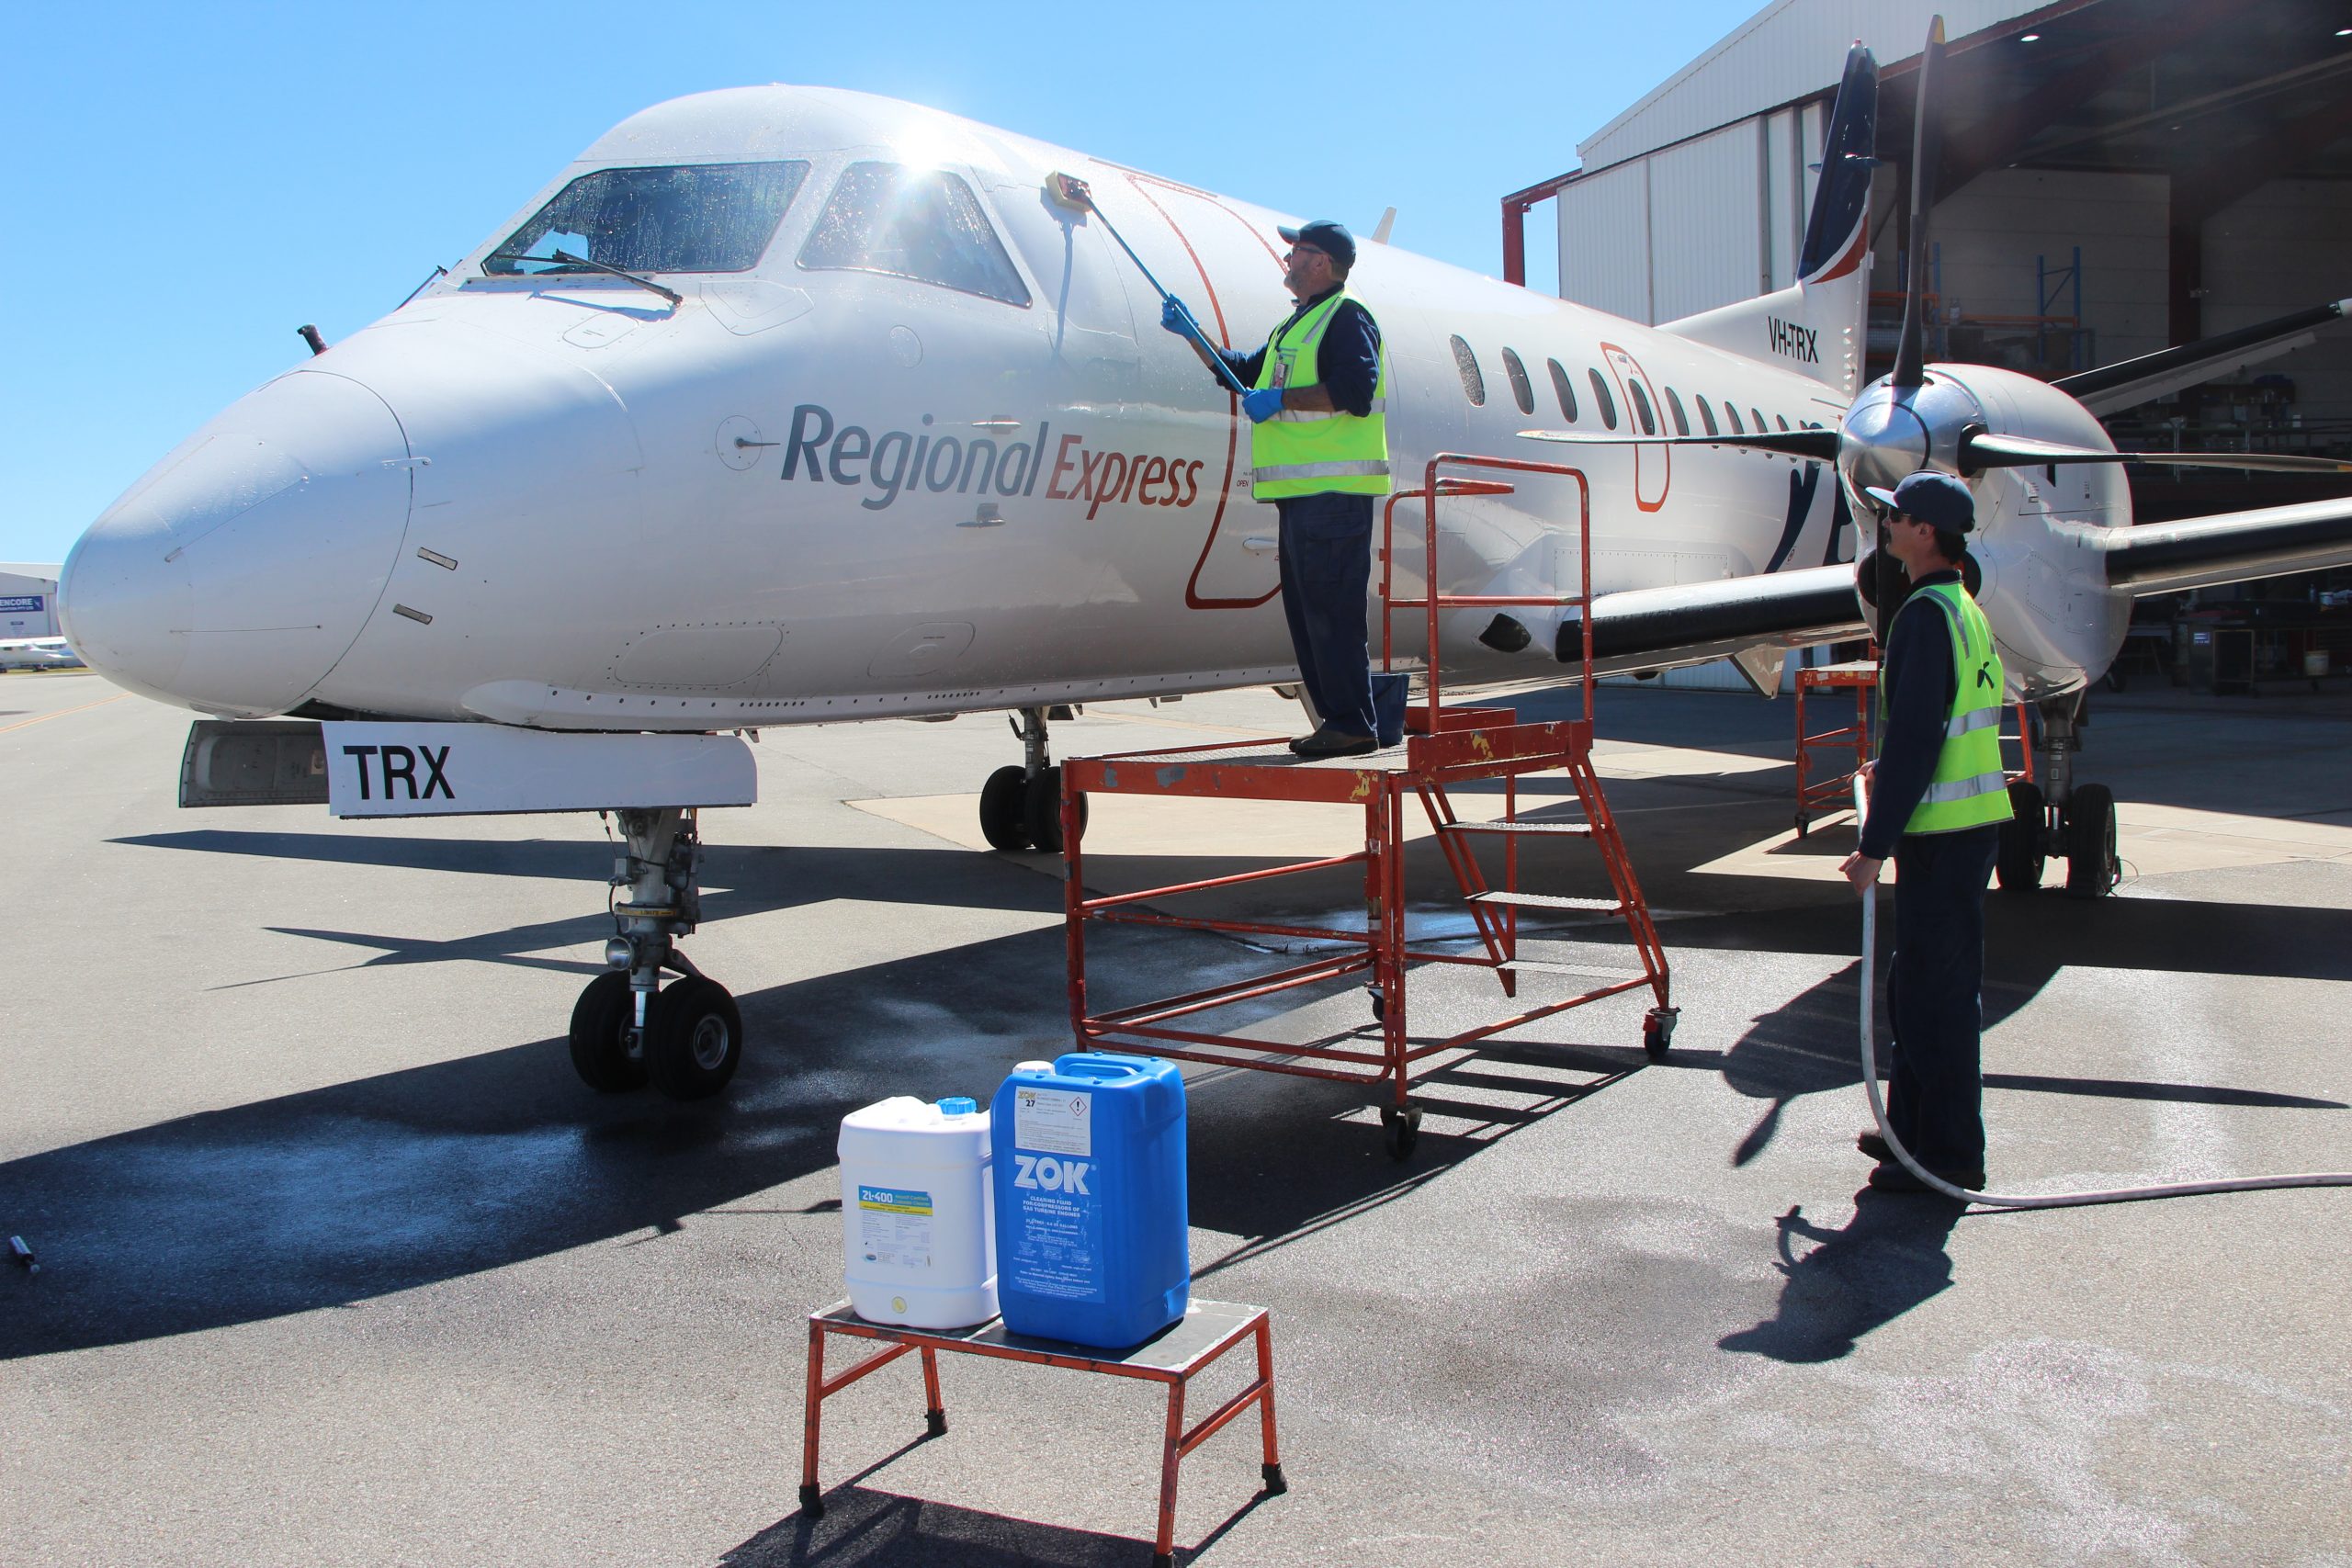

How To Wash The Aircraft
Now let us begin:
- If your aircraft’s manual requires it, tape up doors with the correct “low stick” masking tape.
- Cover pitot tubes, AOA sensors etc. with either the same “low stick” masking tape, the fabric covers supplied with the aircraft, or as the aircraft’s manual instructs.
- Follow any other procedure outlined in your aircraft’s maintenance manual.
- Lightly rinse the entire aircraft to remove loose material and dust/dirt that might scratch the surface.
- Dilute a small quantity of cleaning fluid to the manufacturer’s recommended strength for ‘heavy duty’ or ‘badly soiled’ (i.e. strong). With this concentrated solution, wash all badly fouled areas of the aircraft including brakes and wheels, oleos, exhaust trails, oil streaks and deposits around static wicks.
Most people use a sponge to apply the liquid. Purpose-made soft bristle brushes designed for washing cars are readily available and lend themselves to aircraft washing. A recommended alternative is to spray this strong solution on to these areas with a pressurised sprayer. These are easily found in hardware stores in the gardening section.
Equipment Check List
- Cleaning fluid
- Buckets
- Mop/brush/sponge
- Chamois
- A hose with fine spray nozzle
- Other items of personal preference.
If you are really fortunate, you may have access to a foam applicator for applying the cleaning fluid. This is always the preferred method of applying any cleaning fluid to an aircraft. It saves time and reduces product usage and it is our experience that foam application of correct cleaning products provides the greatest defence against corrosion.
Special Note
Implements (sponges, brushes, etc) used on these badly fouled areas should not be used on the rest of the airframe. Use another set for general airframe cleaning. There is abrasive and potentially damaging material on these areas that you do not want transferred to the rest of the airframe.
Be Careful What You Wash With
Interestingly, when it comes to corrosion protection, we are not yet out of the swamp. Not all aviation approved cleaning products are created equal. Although a product may conform to Boeing and AMS specifications, it is important to understand that this does not mean that the product will effectively inhibit corrosion. In fact, it also doesn’t guarantee that a cleaning product won’t contribute to corrosion. Scientific studies have shown that a popular, fully approved aviation cleaning product increases corrosion rates dramatically. How is this possible? To meet specifications, a cleaning product is only required to demonstrate that it will not corrode an airframe at a greater than specified rate. The accepted corrosion rate threshold varies between Boeing, AMS and MIL-SPEC. This is why it is important to do your research when choosing an aircraft cleaning product. Using a product that is scientifically proven to inhibit and arrest corrosion can save you tens of thousands of dollars in avoidable maintenance costs.
Even if you have a composite aircraft your choice of cleaning product is of equal importance as to that of a metal airframe. Many constituents of commercial and household cleaners will irreversibly damage composite substrates, acrylics, rubber and synthetic seal materials, and even two-pack paint. The wrong choice of cleaner may even damage electrical wiring and terminations. When cleaning products are evaluated for military usage, they are specifically tested on wiring and electrical components.
Above all, never use cleaners containing solvents. These may, as well as damaging the substrate, remove grease from inside bushes and penetrate or otherwise damage seals on rod ends and similar components.
Be Careful What You Wash With
Now let us begin:
- If your aircraft’s manual requires it, tape up doors with the correct “low stick” masking tape.
- Cover pitot tubes, AOA sensors etc. with either the same “low stick” masking tape, the fabric covers supplied with the aircraft, or as the aircraft’s manual instructs.
- Follow any other procedure outlined in your aircraft’s maintenance manual.
- Lightly rinse the entire aircraft to remove loose material and dust/dirt that might scratch the surface.
- Dilute a small quantity of cleaning fluid to the manufacturer’s recommended strength for ‘heavy duty’ or ‘badly soiled’ (i.e. strong). With this concentrated solution, wash all badly fouled areas of the aircraft including brakes and wheels, oleos, exhaust trails, oil streaks and deposits around static wicks.
Most people use a sponge to apply the liquid. Purpose-made soft bristle brushes designed for washing cars are readily available and lend themselves to aircraft washing. A recommended alternative is to spray this strong solution on to these areas with a pressurised sprayer. These are easily found in hardware stores in the gardening section.
Breakout Box:
NOTE: Implements (sponges, brushes, etc) used on these badly fouled areas should not be used on the rest of the airframe. Use another set for general airframe cleaning. There is abrasive and potentially damaging material on these areas that you do not want transferred to the rest of the airframe.
- Next, make up a dilution of the cleaning product at the ratio specified for general (or light) cleaning. With this, go over the entire airframe, starting at the highest point and agitating the solution on the surface with a sponge, broom or rag to loosen dirt and grime. Special brooms are available that are designed for washing trucks and coaches. They are made from materials that will not scratch or damage the surface they are being used on. On an aircraft they save a lot of bending and stretching, not to mention keeping you away from the stuff dripping off the underside of the aircraft.
All cleaning products require a bit of physical effort, despite their manufacturers’ claims of miracles! Products that do not require movement or agitation on the surface are much too aggressive for aircraft use and may contain toxic substances that could end up in your liver. Let alone the damage they must be doing to your aircraft.
- From this point on, depending on the type of airframe, the cleaning process may need to be broken into sections, with rinsing done at the end of each section.
Again, no matter what the manufacturers claim, most detergents will leave spotting that is difficult to remove if they are allowed to dry on the surface. In light of this, move across the airframe as quickly and systematically as possible, using this opportunity to inspect the surface for any damage or defects. To complete the cleaning process re-wash the areas that were pre-cleaned with the concentrated solution. If any parts have been missed go back and re-apply solution to them and rewash.
- Lightly rinse the entire airframe using a fine spray from the hose, and if required finish off with a chamois.
Breakout box:
‘To wax or not to wax?’ Some people swear by the application of a wax or polish to their paintwork. Generally, waxing or using wax containing detergents is discouraged on aircraft. However, if you choose to apply a surface finish, be exceedingly careful to ascertain that it is suitable for and certified for aircraft use. Many polishes contain a cocktail of solvents and hydrocarbons that must never be applied to aircraft. Unfortunately in Australia, there is documented evidence that the use of automotive waxes and cleaning products caused severe damage that necessitated the grounding of aircraft. Some preparations also build up a film on the surface which can capture and lock in marks and blemishes, making future cleaning more difficult. Even if the product information states that it is safe for use on plastics DO NOT apply it to windscreens, canopies and bubbles, or any other plastic aircraft substrate. Again, we are faced with problems that are not a great concern in other facets of life outside of aviation. Many products can leave a film on the windscreen which will produce optical distortion or a halo effect. Both these can be very dangerous in an aircraft. Haloing causes a circular rainbow image to appear on the solid surface of the windscreen. It can be very annoying and dangerous, as it can obscure vision.
When working on a clear surface, such as the windscreen, there is a method that should not be deviated from. When rubbing with a cloth, sponge or even fingers, ALWAYS rub vertical to the horizon. This is extremely important. Should you unwittingly scratch the surface, you will be able to look around the scratch rather than having to try and look through it. Multiple fine scratches can produce a form of optical distortion which fortunately only has minimal effect when viewed vertically. Again, most importantly, only use transparency cleaners that are specifically designed for aviation use. Household or automotive products are not suitable for use on aircraft plastics. Additionally, generally speaking, any product in a pressurised spray can is not suitable for use on aircraft transparencies as they contain hydrocarbons and will slowly degrade the plastic. Remember that pressure pack cans must not be carried on board either.
In closing, many aircraft manuals are sadly deficient in instructions on how to clean an aircraft without causing damage to it. Likewise, aircraft engineers and aircraft cleaning contractors are often undertrained in this area of aircraft maintenance.
Learning the best practices of how to wash an aircraft is well worth the effort. With the right technique and choice of cleaning products and tools, you can maintain your aircraft in optimal condition and save enormous amounts of money on avoidable maintenance – so you can enjoy more time in the air and less time in the hangar.
Interestingly, when it comes to corrosion protection, we are not yet out of the swamp. Not all aviation approved cleaning products are created equal. Although a product may conform to Boeing and AMS specifications, it is important to understand that this does not mean that the product will effectively inhibit corrosion. In fact, it also doesn’t guarantee that a cleaning product won’t contribute to corrosion. Scientific studies have shown that a popular, fully approved aviation cleaning product increases corrosion rates dramatically. How is this possible? To meet specifications, a cleaning product is only required to demonstrate that it will not corrode an airframe at a greater than specified rate. The accepted corrosion rate threshold varies between Boeing, AMS and MIL-SPEC. This is why it is important to do your research when choosing an aircraft cleaning product. Using a product that is scientifically proven to inhibit and arrest corrosion can save you tens of thousands of dollars in avoidable maintenance costs.
Even if you have a composite aircraft your choice of cleaning product is of equal importance as to that of a metal airframe. Many constituents of commercial and household cleaners will irreversibly damage composite substrates, acrylics, rubber and synthetic seal materials, and even two-pack paint. The wrong choice of cleaner may even damage electrical wiring and terminations. When cleaning products are evaluated for military usage, they are specifically tested on wiring and electrical components.
Above all, never use cleaners containing solvents. These may, as well as damaging the substrate, remove grease from inside bushes and penetrate or otherwise damage seals on rod ends and similar components.
The Correct Way To Wash An Aircraft
Before we start with how to wash an aircraft correctly and successfully, maybe we should first ask, why should we wash it? Is this a trick question? Not really.
Of course we wash aircraft to make them clean again after service. Why do they need to be clean?
Is it purely for aesthetic reasons or is there a more important agenda behind this time-consuming task?
The primary purpose of washing is to reduce the amount of corrosion occurring in the airframe. Washing is the first step in the aircraft’s CPCP (Corrosion Prevention & Control Plan).
It has been estimated that 80% of maintenance costs during an aircraft’s life span are attributable to corrosion, so anything that can be done to reduce this figure is of significant benefit.
Other reasons for washing are safety-related: being able to see through windows clearly, not slipping when boarding or disembarking on oil and exhaust fouling etc. Surprisingly to most people, aerodynamics and fuel burn are on the bottom of the list of reasons for washing.
Another highly important, but often overlooked safety benefit of washing is that it provides an opportunity for a thorough inspection. While washing, one can carefully inspect the airframe for impact damage, degradation to seals and plastic components, loose fittings and fastenings and other potential problems.
Now that we have ascertained why we are going to wash the aircraft, let’s get ready to do it.
Equipment Check List
- Cleaning fluid
- Buckets
- Mop/brush/sponge
- Chamois
- A hose with fine spray nozzle
- Other items of personal preference.
If you are really fortunate, you may have access to a foam applicator for applying the cleaning fluid. This is always the preferred method of applying any cleaning fluid to an aircraft. It saves time and reduces product usage and it is our experience that foam application of correct cleaning products provides the greatest defence against corrosion.
Pressure Cleaners Not Recommended
Notice that a pressure-washing device IS NOT INCLUDED in this list! Pressure washers have no place in aircraft cleaning! High pressure water will drive dirt and contaminants deep into lap joints and cavities, causing long-term degradation and damage to the airframe, along with the sand-blasting effect that is created with the particles of grime. Water applied under pressure can also damage and penetrate seals, exacerbate paint loss, and damage the adhesive bonds found on aircraft structures.
Be Careful What You Wash With
Another literally potentially fatal mistake that even professional operators make, is to use cleaning products not specified or intended for aircraft use. On any aircraft type, whether it be ultralight, gyro, GA, RPT or heavy commercial, ONLY use products that have been formulated and approved for use on airframes. Truck and car cleaners undoubtedly do a very good job of cleaning, but they often contain highly corrosive ingredients that may damage the aircraft. The average person does not realise that truck wash usually contains predominantly caustic soda, not something which is compatible with aluminium and other aircraft substrates. Just as alarmingly, many household cleaners and detergents contain high levels of salt. Yes, sodium chloride. Probably the very stuff we are wanting to clean off our aircraft exterior. There are a number of cleaners on today’s market that are being promoted as suitable for aircraft use but have undergone no suitability testing. As a minimum, any aircraft cleaner should have been tested for conformance to AMS 1526B and Boeing BSS7432 by an independent testing laboratory.
Interestingly, when it comes to corrosion protection, we are not yet out of the swamp. Not all aviation approved cleaning products are created equal. Although a product may conform to Boeing and AMS specifications, it is important to understand that this does not mean that the product will effectively inhibit corrosion. In fact, it also doesn’t guarantee that a cleaning product won’t contribute to corrosion. Scientific studies have shown that a popular, fully approved aviation cleaning product increases corrosion rates dramatically. How is this possible? To meet specifications, a cleaning product is only required to demonstrate that it will not corrode an airframe at a greater than specified rate. The accepted corrosion rate threshold varies between Boeing, AMS and MIL-SPEC. This is why it is important to do your research when choosing an aircraft cleaning product. Using a product that is scientifically proven to inhibit and arrest corrosion can save you tens of thousands of dollars in avoidable maintenance costs.
Even if you have a composite aircraft your choice of cleaning product is of equal importance as to that of a metal airframe. Many constituents of commercial and household cleaners will irreversibly damage composite substrates, acrylics, rubber and synthetic seal materials, and even two-pack paint. The wrong choice of cleaner may even damage electrical wiring and terminations. When cleaning products are evaluated for military usage, they are specifically tested on wiring and electrical components.
Above all, never use cleaners containing solvents. These may, as well as damaging the substrate, remove grease from inside bushes and penetrate or otherwise damage seals on rod ends and similar components.
Now let us begin:
- If your aircraft’s manual requires it, tape up doors with the correct “low stick” masking tape.
- Cover pitot tubes, AOA sensors etc. with either the same “low stick” masking tape, the fabric covers supplied with the aircraft, or as the aircraft’s manual instructs.
- Follow any other procedure outlined in your aircraft’s maintenance manual.
- Lightly rinse the entire aircraft to remove loose material and dust/dirt that might scratch the surface.
- Dilute a small quantity of cleaning fluid to the manufacturer’s recommended strength for ‘heavy duty’ or ‘badly soiled’ (i.e. strong). With this concentrated solution, wash all badly fouled areas of the aircraft including brakes and wheels, oleos, exhaust trails, oil streaks and deposits around static wicks.
Most people use a sponge to apply the liquid. Purpose-made soft bristle brushes designed for washing cars are readily available and lend themselves to aircraft washing. A recommended alternative is to spray this strong solution on to these areas with a pressurised sprayer. These are easily found in hardware stores in the gardening section.
Breakout Box:
NOTE: Implements (sponges, brushes, etc) used on these badly fouled areas should not be used on the rest of the airframe. Use another set for general airframe cleaning. There is abrasive and potentially damaging material on these areas that you do not want transferred to the rest of the airframe.
- Next, make up a dilution of the cleaning product at the ratio specified for general (or light) cleaning. With this, go over the entire airframe, starting at the highest point and agitating the solution on the surface with a sponge, broom or rag to loosen dirt and grime. Special brooms are available that are designed for washing trucks and coaches. They are made from materials that will not scratch or damage the surface they are being used on. On an aircraft they save a lot of bending and stretching, not to mention keeping you away from the stuff dripping off the underside of the aircraft.
All cleaning products require a bit of physical effort, despite their manufacturers’ claims of miracles! Products that do not require movement or agitation on the surface are much too aggressive for aircraft use and may contain toxic substances that could end up in your liver. Let alone the damage they must be doing to your aircraft.
- From this point on, depending on the type of airframe, the cleaning process may need to be broken into sections, with rinsing done at the end of each section.
Again, no matter what the manufacturers claim, most detergents will leave spotting that is difficult to remove if they are allowed to dry on the surface. In light of this, move across the airframe as quickly and systematically as possible, using this opportunity to inspect the surface for any damage or defects. To complete the cleaning process re-wash the areas that were pre-cleaned with the concentrated solution. If any parts have been missed go back and re-apply solution to them and rewash.
- Lightly rinse the entire airframe using a fine spray from the hose, and if required finish off with a chamois.
Breakout box:
‘To wax or not to wax?’ Some people swear by the application of a wax or polish to their paintwork. Generally, waxing or using wax containing detergents is discouraged on aircraft. However, if you choose to apply a surface finish, be exceedingly careful to ascertain that it is suitable for and certified for aircraft use. Many polishes contain a cocktail of solvents and hydrocarbons that must never be applied to aircraft. Unfortunately in Australia, there is documented evidence that the use of automotive waxes and cleaning products caused severe damage that necessitated the grounding of aircraft. Some preparations also build up a film on the surface which can capture and lock in marks and blemishes, making future cleaning more difficult. Even if the product information states that it is safe for use on plastics DO NOT apply it to windscreens, canopies and bubbles, or any other plastic aircraft substrate. Again, we are faced with problems that are not a great concern in other facets of life outside of aviation. Many products can leave a film on the windscreen which will produce optical distortion or a halo effect. Both these can be very dangerous in an aircraft. Haloing causes a circular rainbow image to appear on the solid surface of the windscreen. It can be very annoying and dangerous, as it can obscure vision.
When working on a clear surface, such as the windscreen, there is a method that should not be deviated from. When rubbing with a cloth, sponge or even fingers, ALWAYS rub vertical to the horizon. This is extremely important. Should you unwittingly scratch the surface, you will be able to look around the scratch rather than having to try and look through it. Multiple fine scratches can produce a form of optical distortion which fortunately only has minimal effect when viewed vertically. Again, most importantly, only use transparency cleaners that are specifically designed for aviation use. Household or automotive products are not suitable for use on aircraft plastics. Additionally, generally speaking, any product in a pressurised spray can is not suitable for use on aircraft transparencies as they contain hydrocarbons and will slowly degrade the plastic. Remember that pressure pack cans must not be carried on board either.
In closing, many aircraft manuals are sadly deficient in instructions on how to clean an aircraft without causing damage to it. Likewise, aircraft engineers and aircraft cleaning contractors are often undertrained in this area of aircraft maintenance.
Learning the best practices of how to wash an aircraft is well worth the effort. With the right technique and choice of cleaning products and tools, you can maintain your aircraft in optimal condition and save enormous amounts of money on avoidable maintenance – so you can enjoy more time in the air and less time in the hangar.
We now have the results of the new tests from SMI so these numbers will change
Another literally potentially fatal mistake that even professional operators make, is to use cleaning products not specified or intended for aircraft use. On any aircraft type, whether it be ultralight, gyro, GA, RPT or heavy commercial, ONLY use products that have been formulated and approved for use on airframes. Truck and car cleaners undoubtedly do a very good job of cleaning, but they often contain highly corrosive ingredients that may damage the aircraft. The average person does not realise that truck wash usually contains predominantly caustic soda, not something which is compatible with aluminium and other aircraft substrates. Just as alarmingly, many household cleaners and detergents contain high levels of salt. Yes, sodium chloride. Probably the very stuff we are wanting to clean off our aircraft exterior. There are a number of cleaners on today’s market that are being promoted as suitable for aircraft use but have undergone no suitability testing. As a minimum, any aircraft cleaner should have been tested for conformance to AMS 1526B and Boeing BSS7432 by an independent testing laboratory.
Interestingly, when it comes to corrosion protection, we are not yet out of the swamp. Not all aviation approved cleaning products are created equal. Although a product may conform to Boeing and AMS specifications, it is important to understand that this does not mean that the product will effectively inhibit corrosion. In fact, it also doesn’t guarantee that a cleaning product won’t contribute to corrosion. Scientific studies have shown that a popular, fully approved aviation cleaning product increases corrosion rates dramatically. How is this possible? To meet specifications, a cleaning product is only required to demonstrate that it will not corrode an airframe at a greater than specified rate. The accepted corrosion rate threshold varies between Boeing, AMS and MIL-SPEC. This is why it is important to do your research when choosing an aircraft cleaning product. Using a product that is scientifically proven to inhibit and arrest corrosion can save you tens of thousands of dollars in avoidable maintenance costs.
Even if you have a composite aircraft your choice of cleaning product is of equal importance as to that of a metal airframe. Many constituents of commercial and household cleaners will irreversibly damage composite substrates, acrylics, rubber and synthetic seal materials, and even two-pack paint. The wrong choice of cleaner may even damage electrical wiring and terminations. When cleaning products are evaluated for military usage, they are specifically tested on wiring and electrical components.
Above all, never use cleaners containing solvents. These may, as well as damaging the substrate, remove grease from inside bushes and penetrate or otherwise damage seals on rod ends and similar components.
Now let us begin:
- If your aircraft’s manual requires it, tape up doors with the correct “low stick” masking tape.
- Cover pitot tubes, AOA sensors etc. with either the same “low stick” masking tape, the fabric covers supplied with the aircraft, or as the aircraft’s manual instructs.
- Follow any other procedure outlined in your aircraft’s maintenance manual.
- Lightly rinse the entire aircraft to remove loose material and dust/dirt that might scratch the surface.
- Dilute a small quantity of cleaning fluid to the manufacturer’s recommended strength for ‘heavy duty’ or ‘badly soiled’ (i.e. strong). With this concentrated solution, wash all badly fouled areas of the aircraft including brakes and wheels, oleos, exhaust trails, oil streaks and deposits around static wicks.
Most people use a sponge to apply the liquid. Purpose-made soft bristle brushes designed for washing cars are readily available and lend themselves to aircraft washing. A recommended alternative is to spray this strong solution on to these areas with a pressurised sprayer. These are easily found in hardware stores in the gardening section.
Breakout Box:
NOTE: Implements (sponges, brushes, etc) used on these badly fouled areas should not be used on the rest of the airframe. Use another set for general airframe cleaning. There is abrasive and potentially damaging material on these areas that you do not want transferred to the rest of the airframe.
- Next, make up a dilution of the cleaning product at the ratio specified for general (or light) cleaning. With this, go over the entire airframe, starting at the highest point and agitating the solution on the surface with a sponge, broom or rag to loosen dirt and grime. Special brooms are available that are designed for washing trucks and coaches. They are made from materials that will not scratch or damage the surface they are being used on. On an aircraft they save a lot of bending and stretching, not to mention keeping you away from the stuff dripping off the underside of the aircraft.
All cleaning products require a bit of physical effort, despite their manufacturers’ claims of miracles! Products that do not require movement or agitation on the surface are much too aggressive for aircraft use and may contain toxic substances that could end up in your liver. Let alone the damage they must be doing to your aircraft.
- From this point on, depending on the type of airframe, the cleaning process may need to be broken into sections, with rinsing done at the end of each section.
Again, no matter what the manufacturers claim, most detergents will leave spotting that is difficult to remove if they are allowed to dry on the surface. In light of this, move across the airframe as quickly and systematically as possible, using this opportunity to inspect the surface for any damage or defects. To complete the cleaning process re-wash the areas that were pre-cleaned with the concentrated solution. If any parts have been missed go back and re-apply solution to them and rewash.
- Lightly rinse the entire airframe using a fine spray from the hose, and if required finish off with a chamois.
Breakout box:
‘To wax or not to wax?’ Some people swear by the application of a wax or polish to their paintwork. Generally, waxing or using wax containing detergents is discouraged on aircraft. However, if you choose to apply a surface finish, be exceedingly careful to ascertain that it is suitable for and certified for aircraft use. Many polishes contain a cocktail of solvents and hydrocarbons that must never be applied to aircraft. Unfortunately in Australia, there is documented evidence that the use of automotive waxes and cleaning products caused severe damage that necessitated the grounding of aircraft. Some preparations also build up a film on the surface which can capture and lock in marks and blemishes, making future cleaning more difficult. Even if the product information states that it is safe for use on plastics DO NOT apply it to windscreens, canopies and bubbles, or any other plastic aircraft substrate. Again, we are faced with problems that are not a great concern in other facets of life outside of aviation. Many products can leave a film on the windscreen which will produce optical distortion or a halo effect. Both these can be very dangerous in an aircraft. Haloing causes a circular rainbow image to appear on the solid surface of the windscreen. It can be very annoying and dangerous, as it can obscure vision.
When working on a clear surface, such as the windscreen, there is a method that should not be deviated from. When rubbing with a cloth, sponge or even fingers, ALWAYS rub vertical to the horizon. This is extremely important. Should you unwittingly scratch the surface, you will be able to look around the scratch rather than having to try and look through it. Multiple fine scratches can produce a form of optical distortion which fortunately only has minimal effect when viewed vertically. Again, most importantly, only use transparency cleaners that are specifically designed for aviation use. Household or automotive products are not suitable for use on aircraft plastics. Additionally, generally speaking, any product in a pressurised spray can is not suitable for use on aircraft transparencies as they contain hydrocarbons and will slowly degrade the plastic. Remember that pressure pack cans must not be carried on board either.
In closing, many aircraft manuals are sadly deficient in instructions on how to clean an aircraft without causing damage to it. Likewise, aircraft engineers and aircraft cleaning contractors are often undertrained in this area of aircraft maintenance.
Learning the best practices of how to wash an aircraft is well worth the effort. With the right technique and choice of cleaning products and tools, you can maintain your aircraft in optimal condition and save enormous amounts of money on avoidable maintenance – so you can enjoy more time in the air and less time in the hangar.
We now have the results of the new tests from SMI so these numbers will change
Unfortunately, thermodynamics tells us that there is a natural tendency for most metals to return to their original state i.e. the ore from which they were processed (Figure 2). For example, steel reverts to iron ore (oxide or rust), and aluminium reverts back to aluminium oxide (Bauxite). These oxides are the result of corrosion. Therefore, corrosion is inevitable for most engineering alloys in many of the environments in which they are used. The challenge in the application and use of these alloys is to prevent them from corroding.
Why is corrosion a concern in air, marine and land based structures and assets?
Firstly, corrosion damage can reduce section thickness and therefore affect the mechanical integrity of structures through the initiation of fracture and fatigue cracking. This may lead to catastrophic failure and consequent loss of life.
Secondly, it is very expensive to find, remove and repair corrosion damage, and this adds to the through life costs associated with the maintenance of assets.
Thirdly, the time spent on dealing with corrosion represents a loss of capability of a ship, aircraft or land based structure, and the consequent loss of income derived from that asset.
Corrosion is an electrochemical process which develops on a metal surface as a result of the presence of local anodes and cathodes and an electrolyte. The process involves the passage of electric current and ions, and is associated with chemical changes (Figure 3).

Figure 3. Schematic of the corrosion process
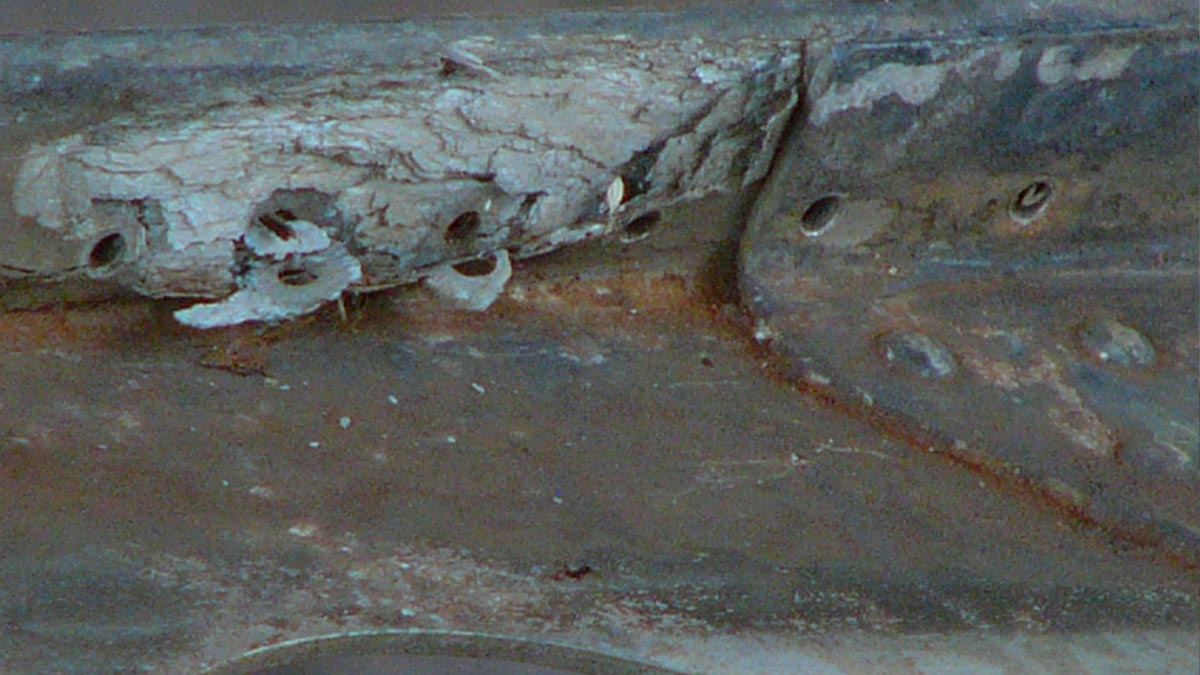
These local anodes and cathodes may be microconstituents in the alloy microstructure (Figure 4), or joints crevice and fastener holes in a structure (Figure 5).
Equipment Check List:
- Cleaning fluid
- Buckets
- Mop/brush/sponge
- Chamois
- A hose with fine spray nozzle
- Other items of personal preference.
If you are really fortunate, you may have access to a foam applicator for applying the cleaning fluid. This is always the preferred method of applying any cleaning fluid to an aircraft. It saves time and reduces product usage and it is our experience that foam application of correct cleaning products provides the greatest defence against corrosion.
Equipment Check List
- Cleaning fluid
- Buckets
- Mop/brush/sponge
- Chamois
- A hose with fine spray nozzle
- Other items of personal preference.
If you are really fortunate, you may have access to a foam applicator for applying the cleaning fluid. This is always the preferred method of applying any cleaning fluid to an aircraft. It saves time and reduces product usage and it is our experience that foam application of correct cleaning products provides the greatest defence against corrosion.
- Cleaning fluid
- Buckets
- Mop/brush/sponge
- Chamois
- A hose with fine spray nozzle
- Other items of personal preference.
If you are really fortunate, you may have access to a foam applicator for applying the cleaning fluid. This is always the preferred method of applying any cleaning fluid to an aircraft. It saves time and reduces product usage and it is our experience that foam application of correct cleaning products provides the greatest defence against corrosion.
Pressure Cleaners Not Recommended
Notice that a pressure-washing device IS NOT INCLUDED in this list! Pressure washers have no place in aircraft cleaning! High pressure water will drive dirt and contaminants deep into lap joints and cavities, causing long-term degradation and damage to the airframe, along with the sand-blasting effect that is created with the particles of grime. Water applied under pressure can also damage and penetrate seals, exacerbate paint loss, and damage the adhesive bonds found on aircraft structures.
Pressure Cleaners Not Recommended
Notice that a pressure-washing device IS NOT INCLUDED in this list! Pressure washers have no place in aircraft cleaning! High pressure water will drive dirt and contaminants deep into lap joints and cavities, causing long-term degradation and damage to the airframe, along with the sand-blasting effect that is created with the particles of grime. Water applied under pressure can also damage and penetrate seals, exacerbate paint loss, and damage the adhesive bonds found on aircraft structures.

Figure 4. Microstructure of an aluminium alloy showing intermetallic particles which act as local cathodes

Figure 5. Steel rivets in a section of aluminium structure
In order for corrosion to occur, these local anodes and cathodes must be in contact with an aqueous environment or electrolyte e.g. a moisture layer containing salt contaminants. At the anode metal ions go into solution releasing electrons into the metal (the corrosion event). At the cathode, electrons are consumed by a cathodic reaction at the adjacent metal surface which may be the reduction of oxygen in the environment. Hydroxyl ions produced by this oxygen reduction reaction migrate to the anode through the electrolyte to maintain an electroneutral surface and an electrochemical circuit is established (Figure 3).
Break the circuit. Prevent corrosion.
This basic mechanism (Figure 3) may be applied to either pitting corrosion, crevice, intergranular, galvanic, or filiform corrosion, or stress corrosion cracking. This basic mechanism helps to understand how corrosion can be controlled or prevented (i.e. breaking the circuit), and is used to explain the effectiveness of various parts of a corrosion prevention strategy for aircraft structures.
The most common way to prevent corrosion from occurring is to apply a barrier coating (paint layer) over the metal surface to stop access of the environment. A paint coating not only acts as a barrier to moisture, it also provides a high resistance pathway to the movement of ions when the barrier has been permeated by water, thus restricting the flow of ions in the electrochemical circuit as depicted in Figure 3, and slowing down the corrosion process. In the event that a coating is damaged or deteriorates over time and fails mechanically, moisture can penetrate to the exposed metal substrate. Inhibitor pigments contained in the pre-treatment layers of paint coatings are available to provide corrosion protection. These inhibitors can act to prevent corrosion by shutting down potential electrochemical reactions at anodes and cathodes on surfaces and inside crevices, pits and cracks. Inhibitors may produce protective layers on the surface either by combination with the metal to form an oxide film for example, or by adsorption of molecules onto the surface.
Corrosion will not occur until the protective coating system fails. All paints on an aircraft structure will admit moisture over time, as they degrade due to weather exposure, UV, temperature excursions from high altitude flight, soil accumulation and stressing.
Evidence of degradation is discoloration, chalking and cracking. As they age and degrade they harden, and cracking develops particularly in areas of structure where flexing can occur e.g. within the joints, inside fastener holes and on mating surfaces. The network of cracks formed will allow all constituents of the atmospheric environment to penetrate through to the substrate metal. Inhibitor ions leached from the primer and conversion coating at the point of cracking will eventually be exhausted and corrosion will occur.
In addition to painting, another corrosion prevention and control strategy for corrosion protection and arrest is the use of the common maintenance action of periodic aircraft washing using detergent products. Washing of soil deposits from a surface removes potential local anodes and cathodes where the paint coating has failed. For example, a soil deposit can create a site for crevice corrosion. Washing not only washes away salt contaminants and dirt or soil, but the surface active nature of chemicals in detergents allows them to penetrate into cracks and joints where coatings have failed. The inclusion of an inhibitor into a detergent formulation when applied to the outside of the aircraft would find its way into cracks in coatings along joints and around fastener heads, and counteract the deleterious effect of any atmospheric contaminants such as chloride ions. These ions are very effective in initiating corrosion.
Zi-400: The Results

a. Control Solution 0.6% NaCl

b. Control Solution with 3% Zi-400 HD

c. Control Solution with 17% Zi-400 HD

d. Control Solution with 3% Product X

e. Control Solution with 17% Product X
Figure 6. Specimens of aluminium alloy AA 2024-T351 after immersion for 30 days in chloride solution with and without Zi-400 HD and Product X.
Figure 6 shows the appearance of specimens of aluminium (Al) alloy AA2024-T351 after immersion for 30 days in a very corrosive Control solution of 0.6% sodium chloride, with and without the presence of Zi-400 HD and Product X. It is clear that after immersion the specimen exposed to the solution without Zi-400 HD was heavily corroded as indicated by the thick layer of aluminium corrosion product, which was associated with individual corrosion pits.
With both concentrations of Zi-400 HD present in solution, no corrosion product was present on the specimens after immersion. The dull appearance of the specimens was due to a very light surface etch. Similar results were observed with aluminium alloy AA7075-T651.
With Product X in the Control solution, severe localised corrosion occurred on the specimen with large amounts of corrosion product present. This corrosion attack was typical of exfoliation corrosion. Exfoliation corrosion is a type of localised corrosion that propagates along the grain boundaries of the elongated grain microstructure of aluminium alloy sheet, plate and extrusions parallel to the component surface. The corrosion products have a greater volume than the original alloy, so their presence creates stress at the grain boundaries, and this wedging action separates layers of metal causing severe delamination.
Exfoliation frequently occurs on aircraft structural aluminium alloy components. This result clearly illustrates the effectiveness of Zi-400 HD as a very effective corrosion inhibitor in an aggressive chloride environment even at low concentrations of 3%. It is important to note that the presence of the Zi-400 HD prevented pitting corrosion and exfoliation corrosion, which is a particular concern if it develops on aircraft structure, as it can lead to the initiation of fatigue cracking.
Using mass loss measurements, corrosion rates were obtained on all specimens after exposure for 30 days to the very corrosive environment. Data for AA2024-T351 are shown in Figure 7. These data confirm the visual observations and show that when Zi-400 HD was present in solution at 3% the corrosion rate was reduced by a factor of 3, and at 17% the corrosion rate was reduced by a factor of around 10. Similar reductions in rate were observed with AA7075-T651. Figure 7 clearly shows that with Product X present there was no inhibition effect and in the case of Product X at 3% the corrosion rate increased.
Rates of 0.001 mm/year (17% Zi-400 HD) indicate negligible corrosion, and they clearly demonstrate the dramatic ability of Zi-400 HD to prevent corrosion from occurring at a significant rate on aluminium alloys in a very corrosive environment.

Figure 7. Corrosion rate data for AA2024-T351 aluminium alloy in 0.6% NaCl solution (Control) and for additions of Zi-400 HD and Product X. The light blue bands represent the scatter obtained in the test data. NB. The Corrosion Rate axis is a log scale.
After cleaning the specimens, the maximum depth of corrosion across the specimen surface was measured using optical profilometry. Figure 8 shows data obtained for specimens of AA2024-T351. Corrosion pits up to a maximum of 47 µm were measured on the specimen immersed in the Control solution. It was difficult to measure the depth of the very light etching rather than pitting on the specimens exposed to the solution with Zi-400 HD at both concentrations, with depths of 3µm and less.

Figure 8. Maximum depths of corrosion measured on specimens of AA2024-T351 after immersion for 30 days in various solutions. NB: The y axis is a log scale.

0.6% NaCl solution (Control)

17% Product X

17% Zi-400 HD
Figure 9. Specimens of SAE 4140 steel after immersion for 30 days in 0.6% NaCl solution (Control) with and without Zi-400 HD or Product X.
It is clear from these images that after 30 days in solution, the steel specimen in the Control solution was heavily corroded with a dense layer of black and red rust. With Zi-400 HD present very little corrosion was evident, and that corrosion was concentrated mainly around the hole used to suspend the specimen in solution. That is normal for a constant immersion corrosion test with steel. With Product X present, some corrosion also occurred around the hole but to a much greater extent and with further corrosion occurring as evidenced by the trail of rust away from the hole. It is clear that the presence of Zi-400 HD prevented pitting corrosion from occurring on the steel, and corrosion around the hole used for suspension of the specimen.

Figure 10. Corrosion rate data for SAE 4140 in 0.6% NaCl solution (Control) and for additions of Zi-400 HD and Product X. The light blue bands represent the scatter obtained in the test data.
The corrosion rate data obtained with the steel specimens are shown in Figure 10. It can be seen that at 3% the Zi-400 HD reduced the corrosion rate significantly, while at 17% the corrosion rate was reduced by a factor of around 6. With Product X present at 3%, the corrosion rate was reduced by a small but significant amount, and at a concentration of 17% the corrosion rate was reduced by a factor of 4. It is well known that high strength steels are very susceptible to corrosion in strong chloride environments. These results are a further demonstration of how effective Zi-400 HD is as a corrosion inhibitor.
Galvanic corrosion occurs where two dissimilar metals are in contact in a corrosive environment. The Galvanic Series is a thermodynamic table which shows the electrochemical potentials of metals and alloys in a sea water environment. These potentials provide an indication of how likely it is that corrosion could occur when dissimilar metals are in contact. Examples of some approximate potential values are given in Table 1.
| Metal or Alloy (Anodes – Undergo corrosion) |
Electrochemical Potential V sce |
| Magnesium alloys | -1.60 – -1.67 |
| Zinc | -1.00 – -1.07 |
| Aluminium alloys | -0.76 – -0.99 |
| Steel | -0.56 – -0.71 |
| Copper | -0.31 – -0.40 |
| Stainless Steels | -0.20 – -0.30 |
| Silver | -0 .09 – -0.13 |
| (Cathodes – Cause corrosion) |
Table 1. Approximate values of electrochemical potential for various metals in seawater.
The metals with very negative potentials will become anodes when in contact with metals with more positive potentials, which act as cathodes. An electrical current will flow between the anode and the cathode, and that current is related to corrosion rate through Faraday’s Law. For example, zinc undergoes galvanic corrosion when in contact with steel or copper. Galvanised steel is an example of galvanic corrosion where the zinc layer corrodes sacrificially to protect the underlying steel.
Dissimilar metal contact frequently occurs in structures where for example bolts or fasteners are used. A typical example would be steel rivets in aluminium aircraft structure. Sealants are typically used to prevent contact between the two dissimilar metals.
In the Deakin University study, a galvanic corrosion test was set up between aluminium alloy AA7075-T651 and copper (Cu) when both were connected and immersed in a 0.6% NaCl environment. As shown in Table 1, a potential difference of around 0.5V exists between these dissimilar metals. This represents a very strong driving force for corrosion of the aluminium alloy.
During immersion over 70 hours the current flowing between these two electrodes while immersed in the solution was monitored. The current is a measure of the corrosion rate on the aluminium alloy in this very aggressive environment.
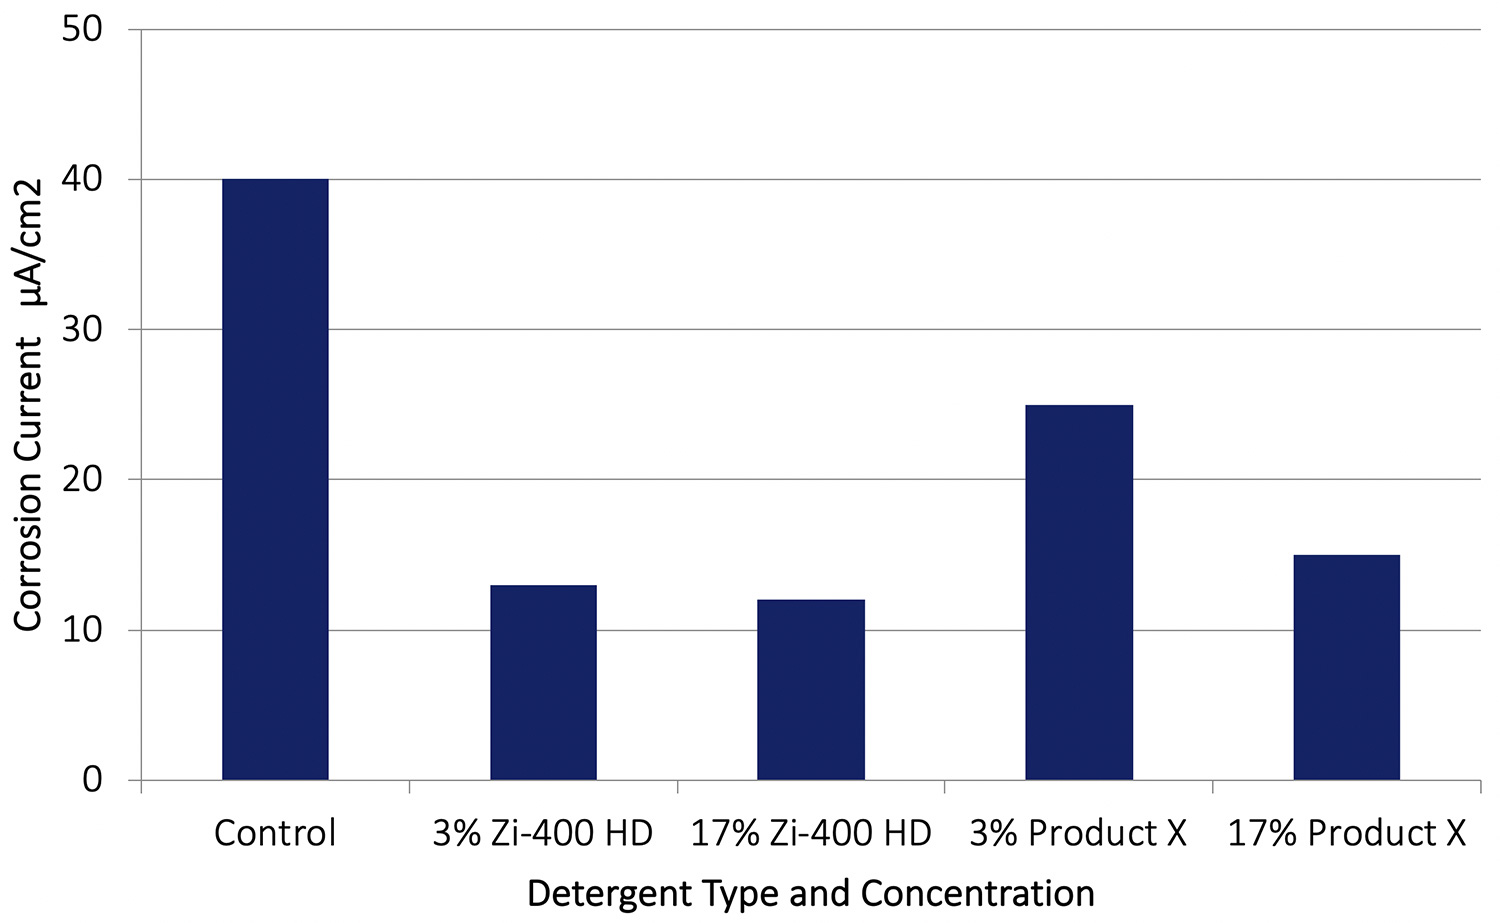
Figure 11. Galvanic corrosion rates (AA7075-Cu couple) obtained after 70 hours immersion in a Control solution (0.6% NaCl) and with various additions of Zi-400 HD.
As shown in Figure 11, when the Zi-400 HD was present the galvanic corrosion rate on the aluminium alloy was reduced significantly. For example, with Zi-400 HD at 3 and 17%, a reduction in corrosion rate of around a factor of 4 was observed. These results show how effective an inhibitor of galvanic corrosion Zi-400 HD is in these very aggressive corrosive conditions. With 3% or 17% of Product X present a significant reduction in corrosion rate occurred also.
In a second series of tests, the galvanic corrosion between AA7075-T651 and Cu was allowed to proceed for 20 hours, and then Zi-400 HD and Product X was added to the control solution. The corrosion rates before the addition of the Zi-400 HD and after an addition are shown in Figure 12. It can be seen that after adding the Zi-400 HD the galvanic corrosion rate was reduced by between a factor of 3 or 4. This is a dramatic reduction in corrosion rate, and clearly demonstrates how effective Zi-400 products are in arresting or retarding an existing aggressive corrosion process. The addition of Product X at both concentrations had no effect on reducing the rate of galvanic corrosion.
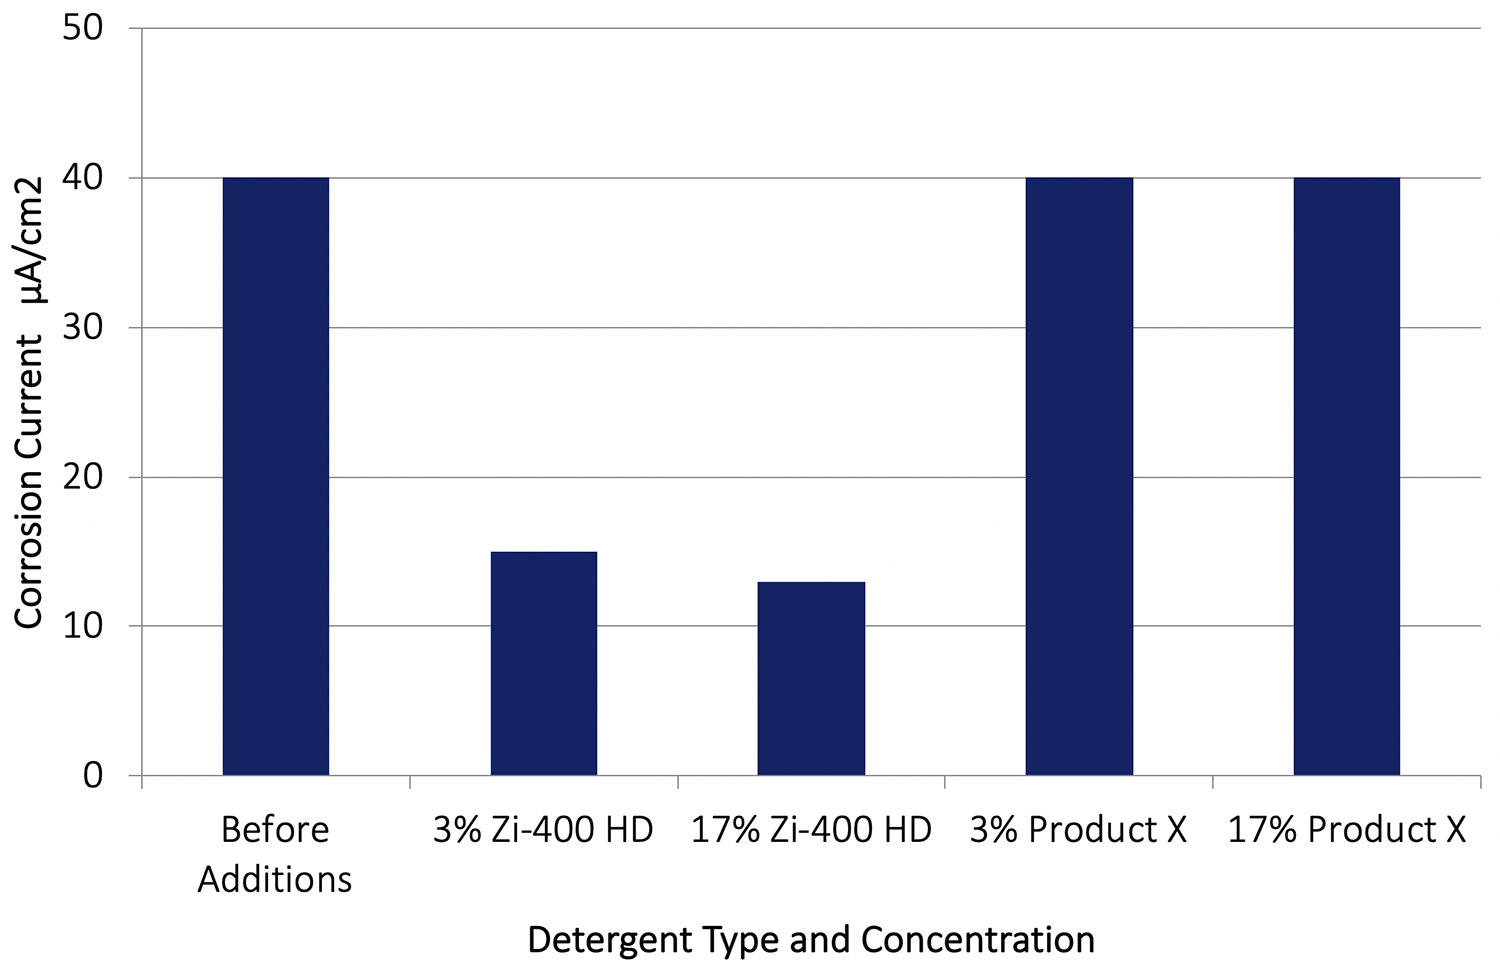
Figure 12. Galvanic corrosion rates obtained between AA 7075-T651 aluminium alloys and copper when immersed in 0.6% NaCl solution before and after the additions of Zi-400 HD and Product X.
A galvanic corrosion test similar to that described above was conducted using aluminium alloy AA2024-T351 with Cu instead of AA7075-T651, and allowed to proceed for 20 hours before adding Zi-400 HD or Product X to the control solution. The results are shown in Figure 13. After adding the Zi-400 HD the galvanic corrosion rate was again reduced by between a factor of 3 or 4, further establishing the product’s exceptional ability to arrest an existing corrosion process. Significantly, the effect of adding Product X aircraft cleaner at both concentrations actually increased the galvanic corrosion rate. At a concentration of 17%, Product X increased the galvanic corrosion rate dramatically from 40 µA/cm2 to 74.5 µA/cm2, almost double the rate.

Figure 13. Galvanic corrosion rates obtained between AA 2024-T351 aluminium alloy and copper when immersed in 0.6% NaCl solution before and after the additions of Zi-400 HD and Product X.
Filiform corrosion (underfilm corrosion) is one of the most common forms of corrosion that can develop on aircraft structures, particularly on aluminium alloy components. It may occur at breaks or cracks in paint coatings and sealants, around fastener heads or along seams and joint lines. Figure 14 shows an example of filiform corrosion on an aircraft wing skin. It occurs where contaminants such as chloride salts are present in the environment and moisture in the form of condensation or high humidity. Corrosion proceeds along the interface between the coating and the underlying metal. The resulting corrosion products cause the coating to de-adhere (blister) producing a worm-like appearance on the surface (filiforms). This corrosion process may continue in the absence of external moisture, because chloride ions are able to migrate along the lines of filiform, and the hygroscopic nature of the chloride salt attracts moisture. If left unattended, the filiform corrosion may develop into intergranular and exfoliation corrosion particularly in fastener holes and this damage may initiate fatigue cracking with serious consequences.

Figure 14. Filiform corrosion propagating from cracked paint around a fastener head on the skin of an aircraft wing.

Figure 15. The penetration of underfilm (filiform) corrosion as a function of time in a solution of 0.6% NaCl with and without (Control) the addition of Zi-400.
These data clearly show that the presence of the Zi-400 had a significant effect on the development of filiform corrosion. It prevented the initiation of the corrosion until somewhere between 10 and 20 days exposure. After 20 days the filiform corrosion had barely propagated. These data suggest that regular washing of painted surfaces with Zi-400 has the potential to prevent the initiation and propagation of filiform corrosion.
Conclusions
- Zi-400 HD has been shown in the Deakin University study to be an excellent inhibitor of corrosion of aluminium alloys and steel in a very corrosive chloride containing environment.
- Its effectiveness as an inhibitor has been demonstrated by its prevention of pitting corrosion under constant and alternate immersion conditions, filiform corrosion, crevice corrosion and galvanic corrosion.
- Zi-400 has the ability to retard and arrest the growth of a corrosion process under very severe conditions. This is of particular value where the corrosion process is driven by the interaction of dissimilar metals providing a very strong driving force for corrosion.
- Zi-400 is able to provide excellent corrosion inhibition because it is thought to adsorb strongly at local cathodes on the surface thus reducing significantly the rates of cathodic reactions, and therefore retarding the overall electrochemical corrosion process.
References
- G. A. Jacobson, Corrosion – A natural but controllable process, https://www.nace.org/resources/general-resources/corrosion-basics
- B. R. W. Hinton, M. Cosgrave, P. Rohan and D. Luscombe, Corrosion Inhibition with Aircraft Washing Detergents, Commercial in Confidence, ARL Report No. CCR 7/93, May, 1993.
- P. Huang, J. Yan, T. Khoo and B. Hinton, Corrosion Inhibition with Aircraft Washing Detergents, Deakin University, Australian Centre for Infrastructure Durability Technical Report No. T-C0098-1, 5 August 2016.
Zi-400: The Science

Zi-400 HD Aircraft Cleaner

Rival Aviation Approved Cleaning Product
Introduction
A common example of corrosion is the rusting of steel (Figure 1).
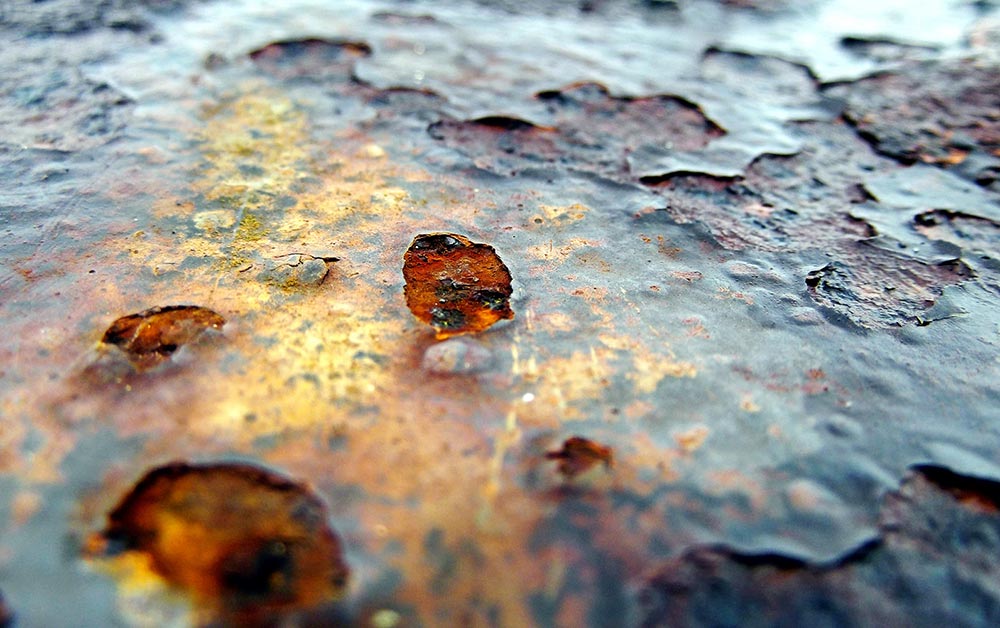
Figure 1. Rust layers on steel

Figure 2. The cycle of metals returning to their original state through corrosion
Unfortunately, thermodynamics tells us that there is a natural tendency for most metals to return to their original state i.e. the ore from which they were processed (Figure 2). For example, steel reverts to iron ore (oxide or rust), and aluminium reverts back to aluminium oxide (Bauxite). These oxides are the result of corrosion. Therefore, corrosion is inevitable for most engineering alloys in many of the environments in which they are used. The challenge in the application and use of these alloys is to prevent them from corroding.
Why is corrosion a concern in air, marine and land based structures and assets?
Firstly, corrosion damage can reduce section thickness and therefore affect the mechanical integrity of structures through the initiation of fracture and fatigue cracking. This may lead to catastrophic failure and consequent loss of life.
Secondly, it is very expensive to find, remove and repair corrosion damage, and this adds to the through life costs associated with the maintenance of assets.
Thirdly, the time spent on dealing with corrosion represents a loss of capability of a ship, aircraft or land based structure, and the consequent loss of income derived from that asset.
The Corrosion Process
Corrosion is an electrochemical process which develops on a metal surface as a result of the presence of local anodes and cathodes and an electrolyte. The process involves the passage of electric current and ions, and is associated with chemical changes (Figure 3).
Figure 3. Schematic of the corrosion process
These local anodes and cathodes may be microconstituents in the alloy microstructure (Figure 4), or joints crevice and fastener holes in a structure (Figure 5).
Figure 4. Microstructure of an aluminium alloy showing intermetallic particles which act as local cathodes
Figure 5. Steel rivets in a section of aluminium structure
In order for corrosion to occur, these local anodes and cathodes must be in contact with an aqueous environment or electrolyte e.g. a moisture layer containing salt contaminants. At the anode metal ions go into solution releasing electrons into the metal (the corrosion event). At the cathode, electrons are consumed by a cathodic reaction at the adjacent metal surface which may be the reduction of oxygen in the environment. Hydroxyl ions produced by this oxygen reduction reaction migrate to the anode through the electrolyte to maintain an electroneutral surface and an electrochemical circuit is established (Figure 3).
Break the circuit. Prevent corrosion.
This basic mechanism (Figure 3) may be applied to either pitting corrosion, crevice, intergranular, galvanic, or filiform corrosion, or stress corrosion cracking. This basic mechanism helps to understand how corrosion can be controlled or prevented (i.e. breaking the circuit), and is used to explain the effectiveness of various parts of a corrosion prevention strategy for aircraft structures.
The most common way to prevent corrosion from occurring is to apply a barrier coating (paint layer) over the metal surface to stop access of the environment. A paint coating not only acts as a barrier to moisture, it also provides a high resistance pathway to the movement of ions when the barrier has been permeated by water, thus restricting the flow of ions in the electrochemical circuit as depicted in Figure 3, and slowing down the corrosion process. In the event that a coating is damaged or deteriorates over time and fails mechanically, moisture can penetrate to the exposed metal substrate. Inhibitor pigments contained in the pre-treatment layers of paint coatings are available to provide corrosion protection. These inhibitors can act to prevent corrosion by shutting down potential electrochemical reactions at anodes and cathodes on surfaces and inside crevices, pits and cracks. Inhibitors may produce protective layers on the surface either by combination with the metal to form an oxide film for example, or by adsorption of molecules onto the surface.
Corrosion will not occur until the protective coating system fails. All paints on an aircraft structure will admit moisture over time, as they degrade due to weather exposure, UV, temperature excursions from high altitude flight, soil accumulation and stressing.
Evidence of degradation is discoloration, chalking and cracking. As they age and degrade they harden, and cracking develops particularly in areas of structure where flexing can occur e.g. within the joints, inside fastener holes and on mating surfaces. The network of cracks formed will allow all constituents of the atmospheric environment to penetrate through to the substrate metal. Inhibitor ions leached from the primer and conversion coating at the point of cracking will eventually be exhausted and corrosion will occur.
In addition to painting, another corrosion prevention and control strategy for corrosion protection and arrest is the use of the common maintenance action of periodic aircraft washing using detergent products. Washing of soil deposits from a surface removes potential local anodes and cathodes where the paint coating has failed. For example, a soil deposit can create a site for crevice corrosion. Washing not only washes away salt contaminants and dirt or soil, but the surface active nature of chemicals in detergents allows them to penetrate into cracks and joints where coatings have failed. The inclusion of an inhibitor into a detergent formulation when applied to the outside of the aircraft would find its way into cracks in coatings along joints and around fastener heads, and counteract the deleterious effect of any atmospheric contaminants such as chloride ions. These ions are very effective in initiating corrosion.
Laboratory Tests with Zi-400
The DST study concluded that Zi-400 was the most effective detergent for inhibiting corrosion in very severe corrosive environments, and most importantly it was capable of arresting or retarding existing corrosion. The study also showed that Zi-400 was very effective in reducing the rate of under film corrosion emanating from defects in an epoxy primer paint coating on an aluminium alloy, and reducing crevice corrosion on an aluminium alloy.
More recently, a comprehensive programme commissioned by Solidus Industries was carried out by Deakin University’s Australian Centre for Infrastructure Durability to undertake a more in depth assessment of how effective Zi-400 HD is as a corrosion inhibitor3. For comparative purposes tests were also conducted on a well-known brand of cleaner, widely used by the aviation industry and approved for use on aircraft (Product X). The main results from this programme are summarised in the remainder of this article. These results demonstrate how very effective Zi-400 HD is as a corrosion inhibitor.
Zi-400: The Results
a. Control Solution 0.6% NaCl
b. Control Solution with 3% Zi-400 HD
c. Control Solution with 17% Zi-400 HD
d. Control Solution with 3% Product X
e. Control Solution with 17% Product X
Figure 6. Specimens of aluminium alloy AA 2024-T351 after immersion for 30 days in chloride solution with and without Zi-400 HD and Product X.
Figure 6 shows the appearance of specimens of aluminium (Al) alloy AA2024-T351 after immersion for 30 days in a very corrosive Control solution of 0.6% sodium chloride, with and without the presence of Zi-400 HD and Product X. It is clear that after immersion the specimen exposed to the solution without Zi-400 HD was heavily corroded as indicated by the thick layer of aluminium corrosion product, which was associated with individual corrosion pits.
With both concentrations of Zi-400 HD present in solution, no corrosion product was present on the specimens after immersion. The dull appearance of the specimens was due to a very light surface etch. Similar results were observed with aluminium alloy AA7075-T651.
With Product X in the Control solution, severe localised corrosion occurred on the specimen with large amounts of corrosion product present. This corrosion attack was typical of exfoliation corrosion. Exfoliation corrosion is a type of localised corrosion that propagates along the grain boundaries of the elongated grain microstructure of aluminium alloy sheet, plate and extrusions parallel to the component surface. The corrosion products have a greater volume than the original alloy, so their presence creates stress at the grain boundaries, and this wedging action separates layers of metal causing severe delamination.
Exfoliation frequently occurs on aircraft structural aluminium alloy components. This result clearly illustrates the effectiveness of Zi-400 HD as a very effective corrosion inhibitor in an aggressive chloride environment even at low concentrations of 3%. It is important to note that the presence of the Zi-400 HD prevented pitting corrosion and exfoliation corrosion, which is a particular concern if it develops on aircraft structure, as it can lead to the initiation of fatigue cracking.
Using mass loss measurements, corrosion rates were obtained on all specimens after exposure for 30 days to the very corrosive environment. Data for AA2024-T351 are shown in Figure 7. These data confirm the visual observations and show that when Zi-400 HD was present in solution at 3% the corrosion rate was reduced by a factor of 3, and at 17% the corrosion rate was reduced by a factor of around 10. Similar reductions in rate were observed with AA7075-T651. Figure 7 clearly shows that with Product X present there was no inhibition effect and in the case of Product X at 3% the corrosion rate increased.
Rates of 0.001 mm/year (17% Zi-400 HD) indicate negligible corrosion, and they clearly demonstrate the dramatic ability of Zi-400 HD to prevent corrosion from occurring at a significant rate on aluminium alloys in a very corrosive environment.
Figure 7. Corrosion rate data for AA2024-T351 aluminium alloy in 0.6% NaCl solution (Control) and for additions of Zi-400 HD and Product X. The light blue bands represent the scatter obtained in the test data. NB. The Corrosion Rate axis is a log scale.
After cleaning the specimens, the maximum depth of corrosion across the specimen surface was measured using optical profilometry. Figure 8 shows data obtained for specimens of AA2024-T351. Corrosion pits up to a maximum of 47 µm were measured on the specimen immersed in the Control solution. It was difficult to measure the depth of the very light etching rather than pitting on the specimens exposed to the solution with Zi-400 HD at both concentrations, with depths of 3µm and less.
Figure 8. Maximum depths of corrosion measured on specimens of AA2024-T351 after immersion for 30 days in various solutions. NB: The y axis is a log scale.
0.6% NaCl solution (Control)
17% Product X
17% Zi-400 HD
Figure 9. Specimens of SAE 4140 steel after immersion for 30 days in 0.6% NaCl solution (Control) with and without Zi-400 HD or Product X.
It is clear from these images that after 30 days in solution, the steel specimen in the Control solution was heavily corroded with a dense layer of black and red rust. With Zi-400 HD present very little corrosion was evident, and that corrosion was concentrated mainly around the hole used to suspend the specimen in solution. That is normal for a constant immersion corrosion test with steel. With Product X present, some corrosion also occurred around the hole but to a much greater extent and with further corrosion occurring as evidenced by the trail of rust away from the hole. It is clear that the presence of Zi-400 HD prevented pitting corrosion from occurring on the steel, and corrosion around the hole used for suspension of the specimen.
Figure 10. Corrosion rate data for SAE 4140 in 0.6% NaCl solution (Control) and for additions of Zi-400 HD and Product X. The light blue bands represent the scatter obtained in the test data.
The corrosion rate data obtained with the steel specimens are shown in Figure 10. It can be seen that at 3% the Zi-400 HD reduced the corrosion rate significantly, while at 17% the corrosion rate was reduced by a factor of around 6. With Product X present at 3%, the corrosion rate was reduced by a small but significant amount, and at a concentration of 17% the corrosion rate was reduced by a factor of 4. It is well known that high strength steels are very susceptible to corrosion in strong chloride environments. These results are a further demonstration of how effective Zi-400 HD is as a corrosion inhibitor.
Galvanic corrosion occurs where two dissimilar metals are in contact in a corrosive environment. The Galvanic Series is a thermodynamic table which shows the electrochemical potentials of metals and alloys in a sea water environment. These potentials provide an indication of how likely it is that corrosion could occur when dissimilar metals are in contact. Examples of some approximate potential values are given in Table 1.
| Metal or Alloy (Anodes – Undergo corrosion) |
Electrochemical Potential V sce |
| Magnesium alloys | -1.60 – -1.67 |
| Zinc | -1.00 – -1.07 |
| Aluminium alloys | -0.76 – -0.99 |
| Steel | -0.56 – -0.71 |
| Copper | -0.31 – -0.40 |
| Stainless Steels | -0.20 – -0.30 |
| Silver | -0 .09 – -0.13 |
| (Cathodes – Cause corrosion) |
Table 1. Approximate values of electrochemical potential for various metals in seawater.
The metals with very negative potentials will become anodes when in contact with metals with more positive potentials, which act as cathodes. An electrical current will flow between the anode and the cathode, and that current is related to corrosion rate through Faraday’s Law. For example, zinc undergoes galvanic corrosion when in contact with steel or copper. Galvanised steel is an example of galvanic corrosion where the zinc layer corrodes sacrificially to protect the underlying steel.
Dissimilar metal contact frequently occurs in structures where for example bolts or fasteners are used. A typical example would be steel rivets in aluminium aircraft structure. Sealants are typically used to prevent contact between the two dissimilar metals.
In the Deakin University study, a galvanic corrosion test was set up between aluminium alloy AA7075-T651 and copper (Cu) when both were connected and immersed in a 0.6% NaCl environment. As shown in Table 1, a potential difference of around 0.5V exists between these dissimilar metals. This represents a very strong driving force for corrosion of the aluminium alloy.
During immersion over 70 hours the current flowing between these two electrodes while immersed in the solution was monitored. The current is a measure of the corrosion rate on the aluminium alloy in this very aggressive environment.
Figure 11. Galvanic corrosion rates (AA7075-Cu couple) obtained after 70 hours immersion in a Control solution (0.6% NaCl) and with various additions of Zi-400 HD.
As shown in Figure 11, when the Zi-400 HD was present the galvanic corrosion rate on the aluminium alloy was reduced significantly. For example, with Zi-400 HD at 3 and 17%, a reduction in corrosion rate of around a factor of 4 was observed. These results show how effective an inhibitor of galvanic corrosion Zi-400 HD is in these very aggressive corrosive conditions. With 3% or 17% of Product X present a significant reduction in corrosion rate occurred also.
In a second series of tests, the galvanic corrosion between AA7075-T651 and Cu was allowed to proceed for 20 hours, and then Zi-400 HD and Product X was added to the control solution. The corrosion rates before the addition of the Zi-400 HD and after an addition are shown in Figure 12. It can be seen that after adding the Zi-400 HD the galvanic corrosion rate was reduced by between a factor of 3 or 4. This is a dramatic reduction in corrosion rate, and clearly demonstrates how effective Zi-400 products are in arresting or retarding an existing aggressive corrosion process. The addition of Product X at both concentrations had no effect on reducing the rate of galvanic corrosion.
Figure 12. Galvanic corrosion rates obtained between AA 7075-T651 aluminium alloys and copper when immersed in 0.6% NaCl solution before and after the additions of Zi-400 HD and Product X.
A galvanic corrosion test similar to that described above was conducted using aluminium alloy AA2024-T351 with Cu instead of AA7075-T651, and allowed to proceed for 20 hours before adding Zi-400 HD or Product X to the control solution. The results are shown in Figure 13. After adding the Zi-400 HD the galvanic corrosion rate was again reduced by between a factor of 3 or 4, further establishing the product’s exceptional ability to arrest an existing corrosion process. Significantly, the effect of adding Product X aircraft cleaner at both concentrations actually increased the galvanic corrosion rate. At a concentration of 17%, Product X increased the galvanic corrosion rate dramatically from 40 µA/cm2 to 74.5 µA/cm2, almost double the rate.
Figure 13. Galvanic corrosion rates obtained between AA 2024-T351 aluminium alloy and copper when immersed in 0.6% NaCl solution before and after the additions of Zi-400 HD and Product X.
Filiform corrosion (underfilm corrosion) is one of the most common forms of corrosion that can develop on aircraft structures, particularly on aluminium alloy components. It may occur at breaks or cracks in paint coatings and sealants, around fastener heads or along seams and joint lines. Figure 14 shows an example of filiform corrosion on an aircraft wing skin. It occurs where contaminants such as chloride salts are present in the environment and moisture in the form of condensation or high humidity. Corrosion proceeds along the interface between the coating and the underlying metal. The resulting corrosion products cause the coating to de-adhere (blister) producing a worm-like appearance on the surface (filiforms). This corrosion process may continue in the absence of external moisture, because chloride ions are able to migrate along the lines of filiform, and the hygroscopic nature of the chloride salt attracts moisture. If left unattended, the filiform corrosion may develop into intergranular and exfoliation corrosion particularly in fastener holes and this damage may initiate fatigue cracking with serious consequences.
Figure 14. Filiform corrosion propagating from cracked paint around a fastener head on the skin of an aircraft wing.
Figure 15. The penetration of underfilm (filiform) corrosion as a function of time in a solution of 0.6% NaCl with and without (Control) the addition of Zi-400.
These data clearly show that the presence of the Zi-400 had a significant effect on the development of filiform corrosion. It prevented the initiation of the corrosion until somewhere between 10 and 20 days exposure. After 20 days the filiform corrosion had barely propagated. These data suggest that regular washing of painted surfaces with Zi-400 has the potential to prevent the initiation and propagation of filiform corrosion.
Conclusions
- Zi-400 HD has been shown in the Deakin University study to be an excellent inhibitor of corrosion of aluminium alloys and steel in a very corrosive chloride containing environment.
- Its effectiveness as an inhibitor has been demonstrated by its prevention of pitting corrosion under constant and alternate immersion conditions, filiform corrosion, crevice corrosion and galvanic corrosion.
- Zi-400 has the ability to retard and arrest the growth of a corrosion process under very severe conditions. This is of particular value where the corrosion process is driven by the interaction of dissimilar metals providing a very strong driving force for corrosion.
- Zi-400 is able to provide excellent corrosion inhibition because it is thought to adsorb strongly at local cathodes on the surface thus reducing significantly the rates of cathodic reactions, and therefore retarding the overall electrochemical corrosion process.
References
- G. A. Jacobson, Corrosion – A natural but controllable process, https://www.nace.org/resources/general-resources/corrosion-basics
- B. R. W. Hinton, M. Cosgrave, P. Rohan and D. Luscombe, Corrosion Inhibition with Aircraft Washing Detergents, Commercial in Confidence, ARL Report No. CCR 7/93, May, 1993.
- P. Huang, J. Yan, T. Khoo and B. Hinton, Corrosion Inhibition with Aircraft Washing Detergents, Deakin University, Australian Centre for Infrastructure Durability Technical Report No. T-C0098-1, 5 August 2016.